
Fig 5.1: Link (24x24 bitmap).
| Video intro | Contents | Keys |
In this chapter, we'll look at the bitmap modes. Bitmap modes are a good place to start because there is a one to one relation between the contents of memory and the pixels on the screen. The essentials of all the bitmap modes will be discussed briefly, with a closer look at what you can do in mode 3 as an example. We'll also see a bit of page flipping (mode 4), which allows for smoother animation.
The chapter will close with a section on how to deal with data and computer memory in general. Because GBA programming is very close to the hardware, you need to know these things. If you've been programming (in C or assembly) for a long time and have already gained a good understanding on data, datatypes and memory you can probably skip it; for the rest of you, I would strongly urge to read it, because it is very important for all the chapters to come.
In fig 5.1 you can find a bitmap of one of the game characters that made Nintendo great. This is probably how most people think of bitmaps: a grid of colored pixels. In order to use bitmaps in a program we need to know how they're arranged in memory. For that we use fig 5.2 (below); this is a zoomed out version of fig 5.1, with a pixel grid imposed over it and some numbers.
A bitmap is little more than a w×h matrix of colors (or color-indices), where w is the number of columns (the width) and h the number of rows (the height). A particular pixel can be referred to with a coordinate pair: (x, y). By the way, the y-axis of the GBA points down, not up. So pixel (0, 0) is in the top-left corner. In memory, the lines of the bitmap are laid out sequentially, so that the following rule holds: in a w×h bitmap, the pixel (x, y) is the (w×y + x)-th pixel. This is true for all C matrices, by the way.
Fig 5.2 shows how this works. This is a w=24 by h=24 bitmap, at 8bpp (8 Bits Per Pixel (=1 byte)). The numbers in yellow indicate the memory locations; you can count them for yourself if you don't believe me. The first pixel, (0, 0), can be found at location 0. The last pixel of the first row (23, 0) is at w−1 (=23 in this case). The first pixel of the second row (0, 1) is at w (=24) etc, etc, till the last pixel at w×h−1.
 Fig 5.2a: zoom out of
fig 5.1, with pixel offsets.
Fig 5.2a: zoom out of
fig 5.1, with pixel offsets.
|
 Fig 5.2b: zoom out of
fig 5.1, with pixel values.
Zero omitted for clarity. Palette on the lefthand side.
Fig 5.2b: zoom out of
fig 5.1, with pixel values.
Zero omitted for clarity. Palette on the lefthand side.
|
Usually it's not actually the width (i.e., the number of pixels in a row) that's important, but the pitch. The pitch is defined as the number of bytes in a scanline. For 8bpp images the pitch and width will usually be the same, but for, say, 16bpp images (2 bytes per pixel) the pitch is the width times two. There's another catch: memory alignment. Alignment will be covered in a later section, but the upshot is that systems generally have a ‘preferred’ type size and can better deal with data if the addresses are a multiple of that type size. This is why windows BMPs' scanlines are always aligned to 32bit boundaries.
Video modes 3, 4 and 5 are the bitmap modes. To use them, put 3, 4
or 5 in the lowest bits of
REG_DISPCNT and
enable BG2. You may wonder why we start with mode 3,
rather than mode 0. The reason for this is that bitmaps are a lot
easier to come to terms with than tilemaps. And this is the
only reason. The truth of the matter is that the bitmap
modes are just too slow to be used for most conventional GBA games.
I can't give an exact figure, but if someone told me 90% or more
of GBA games used tilemodes and not bitmap modes, I wouldn't be
surprised. The only time when bitmap modes would be beneficial
would be either for very static screens (introductory demos) or
very dynamic screens (3D games like Starfox or Doom).
The bitmap modes have the following characteristics:
| mode | width | height | bpp | size | page-flip |
|---|---|---|---|---|---|
| 3 | 240 | 160 | 16 | 1x 12C00h | No |
| 4 | 240 | 160 | 8 | 2x 9600h | Yes |
| 5 | 160 | 128 | 16 | 2x A000h | Yes |
What width, height and bpp mean should be clear by now; the size that the bitmap requires is simply width × height × bpp/8. Page flipping may need some more explanation, but first we'll look at some examples of mode 3 graphics.
We've already seen how to plot pixels, now it's time for some lines and rectangles. Horizontal lines are piss-easy: because the pixels are in adjacent memory, all you need is a simple loop from the starting x to the final x. Vertical lines are nearly as easy: while the pixels aren't right next to each other, they do have a fixed offset between them, namely the pitch. So again a simple loop is all you need. Rectangles are essentially multiple horizontal lines, so those are easy as well.
Diagonal lines are a little trickier, for a number of reasons. Diagonal lines have a slope that indicates how many horizontal steps you need to take before moving to the next scanline. That would only work if the absolute value were lower than one, otherwise you'd get gaps between pixels. For higher slopes, you need to increment vertically, and plot horizontally.
Another point is how to make the routine fast enough to be of real use. Fortunately, these things have all been figured out in the past already, so we'll just use the results here. In this case, we'll use a Bresenham Midpoint algorithm for the line drawing, modified to deal with horizontal and vertical lines separately. While I could explain what the routine does exactly, it is out of the scope of the chapter, really.
Two points I have ignored here are normalization and clipping.
Normalization means making sure the routine runs in the
right direction. For example, when implementing a line drawing
routine that runs from x1 to x2 via an
incrementing for loop, you'd best be sure that x2 is
actually higher than x1 in the first place.
Clipping means cutting the primitive down to fit inside
the viewport. While this is a good thing to do, we will omit it
because it can get really hairy to do it well.
The code below is an excerpt from toolbox.c from the
m3_demo and contains functions for drawing lines, rectangles
and frames on a 16bpp canvas, like in mode 3 and mode 5.
dstBase is the base-pointer to the canvas and
dstPitch is the pitch. The rest of the parameters should be
obvious.
#include "toolbox.h"

//! Draw a line on a 16bpp canvas
void bmp16_line(int x1, int y1, int x2, int y2, u32 clr,
    void *dstBase, uint dstPitch)
{
    int ii, dx, dy, xstep, ystep, dd;
    u16 *dst= (u16*)(dstBase + y1*dstPitch + x1*2);
    dstPitch /= 2;

    // --- Normalization ---
    if(x1>x2)
    {   xstep= -1;  dx= x1-x2;  }
    else
    {   xstep= +1;  dx= x2-x1;  }

    if(y1>y2)
    {   ystep= -dstPitch;   dy= y1-y2;  }
    else
    {   ystep= +dstPitch;   dy= y2-y1;  }


    // --- Drawing ---

    if(dy == 0)         // Horizontal
    {
        for(ii=0; ii<=dx; ii++)
            dst[ii*xstep]= clr;
    }
    else if(dx == 0)    // Vertical
    {
        for(ii=0; ii<=dy; ii++)
            dst[ii*ystep]= clr;
    }
    else if(dx>=dy)     // Diagonal, slope <= 1
    {
        dd= 2*dy - dx;

        for(ii=0; ii<=dx; ii++)
        {
            *dst= clr;
            if(dd >= 0)
            {   dd -= 2*dx; dst += ystep;  }

            dd += 2*dy;
            dst += xstep;
        }
    }
    else                // Diagonal, slope > 1
    {
        dd= 2*dx - dy;

        for(ii=0; ii<=dy; ii++)
        {
            *dst= clr;
            if(dd >= 0)
            {   dd -= 2*dy; dst += xstep;  }

            dd += 2*dx;
            dst += ystep;
        }
    }
}

//! Draw a rectangle on a 16bpp canvas
void bmp16_rect(int left, int top, int right, int bottom, u32 clr,
    void *dstBase, uint dstPitch)
{
    int ix, iy;

    uint width= right-left, height= bottom-top;
    u16 *dst= (u16*)(dstBase+top*dstPitch + left*2);
    dstPitch /= 2;

    // --- Draw ---
    for(iy=0; iy<height; iy++)
        for(ix=0; ix<width; ix++)
            dst[iy*dstPitch + ix]= clr;
}

//! Draw a frame on a 16bpp canvas
void bmp16_frame(int left, int top, int right, int bottom, u32 clr,
    void *dstBase, uint dstPitch)
{
    // Frame is RB exclusive
    right--;
    bottom--;

    bmp16_line(left,  top,   right,  top,    clr, dstBase, dstPitch);
    bmp16_line(left,  bottom, right, bottom, clr, dstBase, dstPitch);

    bmp16_line(left,  top,   left,   bottom, clr, dstBase, dstPitch);
    bmp16_line(right, top,   right,  bottom, clr, dstBase, dstPitch);
}
These functions are very general: they will work for anything that has 16bit colors. That said, it may be annoying to have to add the canvas pointer and pitch all the time, so you could create an interface layer specifically for mode 3 and mode 5. The ones for mode 3 would look something like this:
typedef u16 COLOR;

#define vid_mem         ((COLOR*)MEM_VRAM)

#define M3_WIDTH        240


// === PROTOTYPES =====================================================

INLINE void m3_plot(int x, int y, COLOR clr);
INLINE void m3_line(int x1, int y1, int x2, int y2, COLOR clr);
INLINE void m3_rect(int left, int top, int right, int bottom, COLOR clr);
INLINE void m3_frame(int left, int top, int right, int bottom, COLOR clr);


// === INLINES ========================================================

//! Plot a single \a clr colored pixel in mode 3 at (\a x, \a y).
INLINE void m3_plot(int x, int y, COLOR clr)
{
    vid_mem[y*M3_WIDTH+x]= clr;
}

//! Draw a \a clr colored line in mode 3.
INLINE void m3_line(int x1, int y1, int x2, int y2, COLOR clr)
{
    bmp16_line(x1, y1, x2, y2, clr, vid_mem, M3_WIDTH*2);
}

//! Draw a \a clr colored rectangle in mode 3.
INLINE void m3_rect(int left, int top, int right, int bottom, COLOR clr)
{
    bmp16_rect(left, top, right, bottom, clr, vid_mem, M3_WIDTH*2);
}

//! Draw a \a clr colored frame in mode 3.
INLINE void m3_frame(int left, int top, int right, int bottom, COLOR clr)
{
    bmp16_frame(left, top, right, bottom, clr, vid_mem, M3_WIDTH*2);
}
Finally, there is a m3_fill() function, that fills the
entire mode 3 canvas with a single color.
//! Fill the mode 3 background with color \a clr.
void m3_fill(COLOR clr)
{
    int ii;
    u32 *dst= (u32*)vid_mem;
    u32 wd= (clr<<16) | clr;

    for(ii=0; ii<M3_SIZE/4; ii++)
        *dst++= wd;
}
 Fig 5.3a: drawing in mode 3.
Now, note what I'm doing here: instead of treating VRAM as an array of 16bit values which are appropriate for 16bpp colors, I'm using a 32bit pointer and filling VRAM with a 32bit variable containing two colors. When filling large chunks of memory, it makes no difference if I fill it in N 16bit chunks, or ½N 32bit chunks. However, because you only use half the number of iterations in the latter case, it's roughly twice as fast. In C, it's perfectly legal to do something like this and often actually useful. This is why it's important to know the principles of data and memory. Also note that I'm using pointer arithmetic here instead of array indices. While the compiler generally make the conversion itself, doing it manually is still often a little faster.
While this method is already twice as fast as the ‘normal’
method, there are actually much faster methods as well. We will meet
these later, when we stop using separate toolkit files
and start using tonclib, the code library for tonc. Tonclib
contains the functions described above (only faster), as well
as 8bpp variations of the bmp16_ routines and interfaces
for mode 4 and mode 5.
Below you can find the main code for m3_demo, which uses
the m3_ functions to draw some items on the screen.
Technically, it's bad form to use this many magic numbers, but
for demonstration purposes it should be okay. The result can be seen
in fig 5.3.
#include "toolbox.h"

int main()
{
    int ii, jj;

    REG_DISPCNT= DCNT_MODE3 | DCNT_BG2;

    // Fill screen with grey color
    m3_fill(RGB15(12, 12, 14));

    // Rectangles:
    m3_rect( 12,  8, 108,  72, CLR_RED);
    m3_rect(108, 72, 132,  88, CLR_LIME);
    m3_rect(132, 88, 228, 152, CLR_BLUE);

    // Rectangle frames
    m3_frame(132,  8, 228,  72, CLR_CYAN);
    m3_frame(109, 73, 131,  87, CLR_BLACK);
    m3_frame( 12, 88, 108, 152, CLR_YELLOW);

    // Lines in top right frame
    for(ii=0; ii<=8; ii++)
    {
        jj= 3*ii+7;
        m3_line(132+11*ii, 9, 226, 12+7*ii, RGB15(jj, 0, jj));
        m3_line(226-11*ii,70, 133, 69-7*ii, RGB15(jj, 0, jj));
    }

    // Lines in bottom left frame
    for(ii=0; ii<=8; ii++)
    {
        jj= 3*ii+7;
        m3_line(15+11*ii, 88, 104-11*ii, 150, RGB15(0, jj, jj));
    }

    while(1);

    return 0;
}
Mode 4 is another bitmap mode. It also has a 240×160
frame-buffer, but instead of 16bpp pixels it uses 8bpp pixels. These
8 bits are a palette index to the background palette
located at 0500:0000. The color you'll see on screen
is the color found in the palette at that location.
Pixels of a bitdepth of 8 mean you can only have 256 colors at a time (instead of 32678 in the case of 15bpp), but there are benefits as well. For one, you can manipulate the colors of many pixels by simply changing the color in the palette. An 8bpp frame-buffer also takes up half as much memory as a 16bpp buffer. Not only is it faster to fill (well, in principle anyway), but there is now also room for a second buffer to allow page flipping. Why that's useful will be covered in a minute.
There is, however, one major downsize to using mode 4, which stems from a hardware limitation. With 8bit pixels, it'd make sense to map VRAM as an array of bytes. This would be fine if it weren't for the rather annoying fact that VRAM does not allow byte-writes! Now, because this is a very important point, let me repeat that: You cannot write to VRAM in byte-sized chunks!!!. Byte-reads are ok, but writes have to be done in 16-bit or 32-bit bit chunks. If you do write in bytes to VRAM, the halfword you're accessing will end up with that byte in both its bytes: you're setting two pixels at once. Note that this no-byte-write rule also extends to PALRAM and OAM, but there it doesn't cause trouble because you won't be using that as bytes anyway.
So how to plot single-pixels then? Well, you have to read the whole halfword you're trying to access, mask off the bits you don't want to overwrite, insert your pixels and then write it back. In code:
#define M4_WIDTH    240     // Width in mode 4
u16 *vid_page= vid_mem;     // Point to current frame buffer

INLINE void m4_plot(int x, int y, u8 clrid)
{
    u16 *dst= &vid_page[(y*M4_WIDTH+x)/2];  // Division by 2 due to u8/u16 pointer mismatch!
    if(x&1)
        *dst= (*dst& 0xFF) | (clrid<<8);    // odd pixel
    else
        *dst= (*dst&~0xFF) |  clrid;        // even pixel
}
As you can see, it's a little more complicated than
m3_plot(). It takes a lot longer to run as well.
Still, once you have a pixel plotter, you can create other rendering
routines with ease. The basic code for drawing lines, rectangles,
circles and the like are pretty much independent of how pixels are
formatted. For example, drawing a rectangle is basically plotting
pixels in a double loop.
void generic_rect(int left, int top, int right, int bottom, COLOR clr)
{
    int ix, iy;
    for(iy=top; iy<bottom; iy++)
        for(ix=left; ix<right; ix++)
            generic_plot(ix, iy, clr);
}
This is the generic template for a rectangle drawing routine. As long
as you have a functional pixel plotter, you're in business. However,
business will be very slow in mode 4, because of the complicated
form of the plotter. In all likelihood, it'll be so slow to make it
useless for games. There is a way out, though. The reason
m4_plot() is slow is because you have to take care not to
overwrite the other pixel. However, when you're drawing a horizontal
line (basically the ix loop here), chances are that you'll
have to give that other pixel the same color anyway, so you needn't
bother with read-mask-write stuff except at the edges. The
implementation of this faster (much faster) line algorithm
and subsequently rectangle drawer is left as an exercise for the
reader. Or you can seek out tonc_bmp8.c in tonclib.
You cannot write individual bytes into VRAM (or PALRAM or OAM for that matter). Halfwords or words only, please. If you want to write single bytes, you have to read the full (half)word, insert the byte, and put it back.
Please don't skip this note, and make yourself aware of the full ramifications of this. Errors due to pointer-type mismatches are very easy to make, and you may be writing to VRAM as bytes more often than you think.
Every kind of graphics surface needs its own pixel plottet. In principle, more complicated (multi-pixel) shapes are surface independent. For example, a line routine follows the same algorithm, but simply uses a different plotter for drawing pixels. These generic forms are great in terms of re-usability and maintainability, but can be disastrous when it comes to speed. Creating surface-specific renderers may be extra work, but can on occasion save you up to a factor 100 in speed.
While I could go on to discuss more complicated matters, such as drawing rectangles and blits and text, there's very little reason to do so at this junction. As I said before, the bitmap modes are useful to learn some basic functionality, but for most practical purposes, you're better off with tiled modes.
The primary issue is speed. Even simple primitives such as the ones shown here can take a lot of time, especially if you're not careful in your implementation. For example, a full mode 3 screen-wipe would take about 60% of a VBlank at best! In bad implementations of a screen-wipe, like doing it with a rectangle drawer that calls a non-inline pixel-plotting function, could take as much as 10 frames. And then you still have to draw all your backgrounds and sprites and do the game logic. The phrase ‘crawling horror’ somehow springs to mind at the thought of this.
Aside from that, bitmap modes can use only one background and have no
hardware scrolling to speak of. Also, though this is jumping the
gun a bit, it overlaps the memory that contains the sprite
tiles,
which starts at 0601:0000h. For that reason, you will
only be able to use sprite-tiles 512 to 1023 when in modes 3-5.
Page flipping can alleviate some of these items, but that's not available in mode 3. It is in mode 5, but that uses only a small portion of the screen, so gaming with only that looks awkward. As for mode 4, well, that's one of those places where you will really see what programming close to the hardware means: it doesn't allow you to write to VRAM in byte-sized chunks! The only way to have a single-pixel resolution is to combine 2 adjacent pixels and write those, which costs a lot of extra time.
So basically, use the bitmap modes for testing and/or static images, but not much else unless you know the tilemodes can't do what you want.
Do not get too comfortable with bitmap modes. They're nice for gbadev introductory sections because they are easier to work with than tile modes, they are not suitable for most types of games because the GBA simply can't push pixels fast enough. Tinker with them to get a feel for IO registers and the like, then move on.

Page flipping is a technique that eliminates nasty artifacts like tearing in animation. There are two things going on at the same time in an animation: placing the pixels on bitmap (writing), and drawing the bitmap on screen (displaying). Software takes care of writing, updating the positions of characters etc; hardware does the displaying: it simply takes the bitmap and copies it to the screen. The problem is that both these processes take time. What's worse, they happen at the same time. And when the game state changes in mid draw, the bottom section will be of the current state, while the top section will represent the previous state. Needless to say, this is bad.
Enter page flipping. Instead of using one single bitmap to write and display, you use two. While one bitmap is displayed, you write all you need onto a second bitmap (the back-buffer). Then, when you're finished, you tell the hardware to display that second bitmap and you can prepare the next frame on the first. No artifacts whatsoever.
While the procedure works great, there are some snares. For the
first, consider this. Given are the pointers to the two pages
page1 and page2. Right now,
page1 is displayed and
page2 is being prepared; so far so good. But when you
switch to the second page, this only makes page2 the
display-page; you have to make page1 the write-page
yourself! The solution to this problem is simple: use a write-buffer
pointer, but it can catch you off-guard if you're new to this stuff.
The second problem concerns a little nasty in the age-old method of animation. The canonical animation does this. Frame1: draw object. Frame2: erase old object, draw object in new state. This doesn't work for page flipping since Frame2 is written on an entirely different bitmap than Frame1, so trying to erase Frame1's old object doesn't. What you need to erase is the object from 2 frames ago. Again, easy solution, but you have be aware of the problem. (Of course, erasing the entire frame each time would work too, but who's got the time?)
Another method of smoother animation is double buffering: draw on a secondary buffer (the backbuffer) and copy it to the screen when finished. This is a fundamentally different technique than page flipping! Even though both use two buffers, in page flipping you don't copy the backbuffer to the display buffer, you make backbuffer the display buffer.
What the GBA does is page flipping, so refer to it as such.
The second page of the GBA is located at location 0600:A000h.
If you look at the size required for mode 3, you'll see why it doesn't
have page-flipping capabilities: there's no room for a second page. To set
the GBA to display the second page, set
REG_DISPCNT{4}.
My page flipping function looks a little like this:
u16 *vid_flip()
{
    // toggle the write_buffer's page
    vid_page= (u16*)((u32)vid_page ^ VID_FLIP);
    REG_DISPCNT ^= DCNT_PAGE;            // update control register
    return vid_page;
}
The code is relatively straightforward. vid_page is the
pointer that always points to the write-page. I had to pull a little
casting trickery to get the XOR to work (C doesn't like it
when you try it on pointers). On the GBA, the steps for page flipping
are perfectly xorrable operations. Sure, you could just put the
equivalent in an if-else block, but where's the fun in
that :P?
What follows is the code (sans data) for the pageflip demo.
The actual part concerned with page flipping is very small. In
fact, the actual flip is merely a call to vid_flip()
once every 60 frames = 1 second (point 3). We'll also have to set the
video mode to something that actually has pages to flip, which in this
case is mode 4.
What we'll have to do as well is load the data that will be displayed
on these two pages. I'm using the standard C routine
memcpy() for the copy, because that's the standard way of
copying things in C. While it's faster than manual loops, it does come
with a few snares that you need to
be aware of before using it everywhere. Tonclib comes with faster
and safer routines, but we'll get to those when it's time.
Loading a bitmap is very simple in theory, but the bitmap(s)
I'm using are only 144x16 in size, while the VRAM page's pitch is 240
pixels wide. This means that we'll have to copy each scanline
separately, which is done at point (1). Note that I'm copying
frontBitmap to vid_mem_front and
backBitmap to vid_mem_back, because those
are the starting locations of the two pages.
Since these are mode 4 bitmaps, they'll also need a palette. Both
palettes use frontPal, but instead of using
memcpy() to copy it to the background palette memory,
I'm using a u32-array because … well, just because I guess.
Lastly, you can pause and unpause the demo by holding down start.
#include <string.h>

#include <toolbox.h>
#include "page_pic.h"

void load_gfx()
{
    int ii;
    // (1) Because my bitmaps here don't fit the  screen size,
    // I'll have to load them one scanlline at a time
    for(ii=0; ii<16; ii++)
    {
        memcpy(&vid_mem_front[ii*120], &frontBitmap[ii*144/4], 144);
        memcpy(&vid_mem_back[ii*120], &backBitmap[ii*144/4], 144);
    }

    // (2) You don't have to do everything with memcpy.
    // In fact, for small blocks it might be better if you didn't.
    // Just mind your types, though. No sense in copying from a 32bit
    // array to a 16bit one.
    u32 *dst= (u32*)pal_bg_mem;
    for(ii=0; ii<8; ii++)
        dst[ii]= frontPal[ii];
}

int main()
{
    int ii=0;

    load_gfx();
    // Set video mode to 4 (8bpp, 2 pages)
    REG_DISPCNT= DCNT_MODE4 | DCNT_BG2;

    while(1)
    {
        while(KEY_DOWN_NOW(KEY_START)); // pause with start
        vid_vsync();

        // (3) Count 60 frames, then flip pages
        if(++ii == 60)
        {
            ii=0;
            vid_flip();
        }
    }
    return 0;
}


This section is a little boring (ok, very boring) but it needs to be said. While books and tutorials on C may use data for whatever purpose, they often gloss over what data actually is at the lowest level, and how to deal with it correctly. As you'll be dealing directly with hardware and memory here, it is important that you are aware of these items, preferably even understand them, so that they don't bite you in the ass at some later point.
The first two subsections are about how to get graphics into your game, something that you'll really need to know. After that I'll discuss a few nasty and highly technical things that may or may not cause problems later on. These are optional and you can skip to the data-loading/interpreting demo at any time. That said, I urge you to read them anyway because they may save you a lot of debugging time.
When you get right down to it, everything on computers is merely a big mess of bits without any purpose by itself. It is the interaction between hardware and software that makes sequences of bits appear as valid executable code, a bitmap, music or whatever.
This may be a good point to say a few words on data.
Strictly speaking, everything is data, but in this case I'm
referring to data that on PC games would be separate
from the executable: graphics, music, maybe scripts and text-files
and what not. This all works fine on a PC, but not so fine on the
GBA because there is no file system. This means that you
cannot use the standard file I/O routines (fscanf(),
fread(), etc) to read the data, because there are no
files to read them from.
All the game's data has to be added directly to the binary. There are a number of ways to do this. The most common way is to convert the raw binary files to C-arrays, then compile those and link them to the project. Well, the most common among homebrewers is probably converting to C-arrays and #including them, but that's something that you should never do. Also popular are assembly arrays. These are a useful alternative to C arrays because a) they can't be #included and b) because they bypass the compilation step and compilation of arrays is very intensive. Of course, you would have to know how to work with the assembler. Another nice thing about the assembler is that you can include binary files directly into them, eliminating the need for a converter. Lastly, while the GBA doesn't have a native file system, you can always write your own. A common one is GBFS by the gbadev forum FAQ maintainer, tepples. Using a file system is actually the recommended method, but for now, I'll stick to C-arrays because they are the easiest to use.
There were no files in the past, but in July of 2006, Chishm gave us libfat, which is a FAT-like file system for GBA and NDS. It is distributed via DKP as well, so chances are you have it already.
By default, arrays go into IWRAM. You know, the one that's only 32 kb
long. Now, a mode 3 bitmap is 240x160x2 = 77 kb. Obviously,
trying to put a 77 kb object into a 32kb section would fit nicely
into the bad things category. To avoid this, put it in the read-only
section (ROM), which is much larger. All you have to do for this is
add the ‘const’ keyword to the definition
if you're using C, or the ‘.rodata’
directive in assembly. Note that for multiboot programs ROM actually
means EWRAM, which is only 256 kb long. The latter would fit three
mode 3 bitmaps; more would again be bad unless you use compression.
Note that what I said about arrays is true for all arrays, not just data arrays: if you want any kind of large array (like a backbuffer for mode 3), it would also default to and kill IWRAM. But you can't make it const because then you'd not be able to write on it. GCC has attributes that lets you choose where things are put – in EWRAM for instance. Here are the commonly seen #defines for the attributes that can be used for specific section placement.
#define EWRAM_DATA __attribute__((section(".ewram")))
#define IWRAM_DATA __attribute__((section(".iwram")))
#define  EWRAM_BSS __attribute__((section(".sbss")))

#define EWRAM_CODE __attribute__((section(".ewram"), long_call))
#define IWRAM_CODE __attribute__((section(".iwram"), long_call))
Data that you don't expect to change in your game should be defined
as constant data using the ‘const’ keyword,
lest it trashes your IWRAM.
There are two little snags that you can trip on if you're using
(converted) data arrays in C++. The first is that tools that generate
the arrays will output C-files, not C++-files. This is not a problem
in itself because those files will be compiled just the same. What
is a problem is that C++ uses something known as
Name mangling
to allow overloading and stuff like that. C doesn't and as a result,
the name that the C++ file looks for isn't the same one as in the
C file and you get undefined references. To fix this, use
`extern "C"' in front or around the declarations of the
stuff in the C files.
// This:

extern "C" const unsigned char C_array[];

// Or this:
extern "C"
{
const unsigned char C_array1[];
const unsigned char C_array2[];
}
Another problem with C++ is that const-arrays are considered static
(local to the file that contains it) unless you add an external
declaration to it. So if you just have
`const u8 foo[]= { etc }' in a file, the array will be
invisible to other files.The solution here would be to add the
declaration inside the file itself as well.
// foo.cpp. Always have an external declaration
// inside the file as well.

extern const unsigned char foo[];

const unsigned char foo[]=
{
    // data
};
It's rather easy to write a tool that converts a binary file to a C or asm array. In fact, devkitARM comes with two that do just that: raw2c.exe and bin2s.exe. It also comes with the basic tools for gbfs by the way. But being able to attach binary files to your game is only part of the story. Consider a bitmap, for example. In principle, a bitmap is a binary file just like any other. There's nothing inherently graphical about it, and it doesn't magically appear as a bitmap whenever you use it by itself. Yes, when you double-click on it, an image viewer may pop up and display it, but that's only because there's some serious work by the OS going on underneath. Which we don't have here.
Most files will follow a certain format to tell it what it is, and how to use it. For bitmaps, that usually means width, height, bitdepths and a few other fields as well. The point is that they're not directly usable. You can't just attach, say, a BMP file to your project and copy it to VRAM and think that everything will work out. No, you have to convert it to a GBA-usable format. Now, you can do this internally (on the GBA itself), or externally (on the PC and attach the converted data to the project). Because the latter is a much more efficient use of GBA resources, that is the usual procedure.
There are many conversion tools, one might almost say too many. Some are one-trick ponies: a single file-type to a single graphics mode for example. Some are very powerful and can handle multiple file-types, multiple files, different conversion modes with lots of options on the side, and compression. It should be obvious which are of the most value.
A good one is gfx2gba. This is a command-line tool so that it can be used in a makefile, but there is a GUI front-end for it as well. This tool has the Good Things I mentioned earlier, plus some map-exporting options and palette merging, but the input file must be 8bit and I hear that while it does compress data, the array-size is still given as its uncompressed size for some unfortunate reason. This tool comes with the HAM installation, and is quite common, so definitely recommended. Unfortunately, there seems to be another tool with the same name. You'll want the v0.13 version by Markus, not the other one.
Personally, I use Usenti, but then I pretty much have to because its my own tool. This is actually a bitmap editor with exporting options thrown in. It allows different file-types, different bitdepths, different output files, all modes, some map-exporting stuff, meta-tiling, compression and a few others. It may not be as powerful as big photo-editing tools as PhotoShop, Gimp and the like, but it gets the job done. If you're still drawing your graphics with MS-Paint, please stop that and use this one instead. The exporter is also available separately in the form of the open source project called (win)grit, which comes in a command-line interface (grit) and a GUI (wingrit). As of January 2007, it is also part of the devkitPro distribution.
There are many command-line interfaces available for graphics conversion, but to make them function you need the correct flags. Here are examples for gfx2gba and grit, converting a bitmap foo.bmp to a C array for modes 3, 4 and 5. This is just an example, because this is not the place for a full discussion on them. Look in their respective readme's for more details.
# gfx2gba
# mode 3, 5 (C array; u16 foo_Bitmap[]; foo.raw.c)
	gfx2gba -fsrc -c32k foo.bmp
# mode 4 (C array u8 foo_Bitmap[], u16 master_Palette[]; foo.raw.c, mastel.pal.c)
	gfx2gba -fsrc -c256 foo.bmp
# grit
# mode 3, 5 (C array; u32 fooBitmap[]; foo.c foo.h)
	grit foo.bmp -gb -gB16
# mode 4 (C array; u32 fooBitmap[], u16 fooPal[]; foo.c foo.h)
	grit foo.bmp -gb -gB8
| big u32 | 0x01020304 | |||
|---|---|---|---|---|
| big u16 | 0x0102 | 0x0304 | ||
| u8 | 0x01 | 0x02 | 0x03 | 0x04 |
| little u16 | 0x0201 | 0x0403 | ||
| little u32 | 0x04030201 | |||
Below, you can see a partial listing of modes.c, which contains the bitmap and the palette used in the bm_modes demo discussed at the end of this section, as exported by Usenti. It is only a very small part of the file because at over 2700 lines it is way too long to display here, which wouldn't serve much of a purpose anyway. Note that both are u32-arrays, rather than the u8 or u16-arrays you might encounter elsewhere. What you need to remember is that it doesn't matter in what kind of an array you put the data: in memory it'll come out the same anyway.
Well, that's not quite true. Only with u32-arrays is proper
data alignment guaranteed, which is
a good thing. More importantly, you have to be careful with the
byte-order of multi-byte types. This is called the endianness of types. In
a little endian scheme, least significant bytes will go
first and in a big endian, most significant bytes will go
first. See table 2 for an example using 0x01,
0x02, 0x03 and 0x04. The GBA
is a little endian machine, so the first word of the
modesBitmap array, 0x7FE003E0 is the
halfwords 0x03E0 (green) followed by 0x7FE0
(cyan). If you want more examples of this, open up VBA's memory
viewer and play around with the 8-bit, 16-bit and 32-bit settings.
The key point here: the data itself doesn't change when you use different data-types for the arrays, only the way you represent it does. That was also the point of the bm_modes demo: it's the same data in VRAM all the time; it's just used in a different way.
//======================================================================
//
//  modes, 240x160@16,
//  + bitmap not compressed
//  Total size: 76800 = 76800
//
//  Time-stamp: 2005-12-24, 18:13:22
//  Exported by Cearn's Usenti v1.7.1
//  (comments, kudos, flames to "daytshen@hotmail.com")
//
//======================================================================

const unsigned int modesBitmap[19200]=
{
    0x7FE003E0,0x7FE07FE0,0x7FE07FE0,0x7FE07FE0,0x7FE07FE0,0x7FE07FE0,0x7FE07FE0,0x7FE07FE0,
    0x080F080F,0x080F080F,0x080F080F,0x080F080F,0x080F080F,0x080F080F,0x080F080F,0x080F080F,
    0x080F080F,0x080F080F,0x080F080F,0x080F080F,0x080F080F,0x080F080F,0x080F080F,0x080F080F,
    0x080F080F,0x080F080F,0x080F080F,0x080F080F,0x080F080F,0x080F080F,0x080F080F,0x080F080F,
// ...
// over 2500 more lines like this
// ...
    0x080F080F,0x080F080F,0x080F080F,0x080F080F,0x080F080F,0x080F080F,0x080F080F,0x080F080F,
    0x080F080F,0x080F080F,0x080F080F,0x080F080F,0x080F080F,0x080F080F,0x080F080F,0x080F080F,
    0x080F080F,0x080F080F,0x080F080F,0x080F080F,0x080F080F,0x080F080F,0x080F080F,0x080F080F,
    0x7FE07FE0,0x7FE07FE0,0x7FE07FE0,0x7FE07FE0,0x7FE07FE0,0x7FE07FE0,0x7FE07FE0,0x7FE07FE0,
};

const unsigned int modesPal[8]=
{
    0x7FE07C1F,0x03FF0505,0x03E00505,0x7C000000,0x0000080F,0x00000000,0x00000000,0x080F0000,
};
Those 2700 lines represent a 77kb bitmap. One single bitmap. In all likelihood, you'll need at least a couple of them to make anything worthwhile. Most games have lots of data in them, not only graphics but maps and sound and music as well. All this adds up to a huge amount of data, certainly too much for just EWRAM and maybe even for a full cart. That is why compression is also important. The GBA BIOS has decompression routines for bit-packing, run-length encoding, LZ77 and Huffman. Converters sometimes have the appropriate compressors for these routines, which can drastically shrink the amount of memory used. Usenti and (win)grit support these compressors. So does gfx2gba, which even has some more. A tool that just does compression on binary files (but does it very well) is GBACrusher. I won't go into compression that much (or at all), but you can read up on the subject here.
It is vital that you understand what data is, how the different datatypes work. Preferably endianness and alignment too. Emulators and hex editors can help you with this. Once you have compilation working, just make a few random arrays and see what they look like in the VBA memory viewer for a while.

Most non-trivial projects will have multiple files with code and data. The standard way of dealing with these is to compile these separately and then link the results to the final binary. This is the recommended strategy. However, most other tutorials and many of the example code you can find on the web do something else: they #include everything into the main source file and compile that. This is not a recommended practice and should be avoided.
”But why not? It seems to work fine, and it's so easy!”
Yes, it is easy; and it does seem to work. The main problem is that it isn't scalable. For small projects (a handful of files) you probably won't notice, but as projects grow to hundreds and perhaps thousands of files, you will run into some very annoying problems. The main issue is what #include actually does. It copies the whole included file into the includer to form a single larger file. This leads to the following issues.
Massive files to compile. So, #including creates one big file. If you have a lot of stuff, you'll have one very big file. This will cost large amounts of memory and slows down compilation. As the project grows, what starts as a compile time of a second can grow to several, then minutes and perhaps even hours.
At some point, there was also the problem that the compiler couldn't handle files exceeding 4MB, putting a limit on how much you could #include in a C file. I'm not sure if this is still an issue.
Undeclared identifiers, multiple definitions and circular dependencies. In a nutshell, C requires that you declare an identifier before it's referenced, and it can only be defined once. The first point means that the order of inclusions starts to matter: if, say, fileB.c needs something from fileA.c, the latter needs to be included before the former to get a compile. The second means that you could only #include a file once in the whole project: if fileB.c and fileC.c both need stuff from fileA.c, you can't #include it in them both because when they're #included in main.c, fileA.c is effectively #included twice and the compiler will balk.
These points can technically be overcome by being careful. But, again, when projects grow, things can get increasingly more difficult to keep track of which comes before what and why. There is, however, one point at which it will go wrong, namely when there are circular dependencies: fileB.c needs fileA.c and vice versa. Each file would require the other to go first, which simply isn't possible because it'd cause multiple definitions.
Data alignment. I'll get to what this means in a minute, but right now know that copy routines work better if the data is aligned to 32-bit boundaries (even for byte and halfword arrays). Some of them won't even work properly if this isn't the case. This is usually guaranteed if you compile separately, but if the arrays are #included and no steps have been taken to force alignment, you simply never know.
It's not much of a problem nowadays because most graphics converters force data-alignment, but you still need to know about it. Because data alignment is a fairly esotheric concept, it's next to impossible to track down unless you're aware of the problems it can bring.
So please, do yourself a favor and do not #include every file you have into main.c or its moral equivalent. Put function and variable definitions in separate source files to be compiled separately and linked later. The #include directive is only to be used for files with preprocessor directives and declaractions and type definitions. Oh, and inline functions. Those are okay there too.
So what do you do instead? Well, for starters keep all the code and data in separate source files. Compile these separately by invoking gcc on each file. This gives you a list of object files. These you then link together. In batch files, you'd need to add extra commands for each file, but a properly setup makefile uses a list of object files, and the makefile's rules will then take care of the rest automatically. Using the makefile of the second demo as a reference, you'll get something like this:
# partial makefile for using multiple source files
# some steps omitted for clarity

# 3 targets for compilation
OBJS    := foo.o bar.o boo.o

# link step: .o -> .elf
$(PROJ).elf : $(OBJS)
	$(LD) $^ $(LDFLAGS) -o $@

# compile step .c -> .o
$(OBJS) : %.o : %.c
	$(CC) -c $< $(CFLAGS) -o $@
The OBJS variable contains the names of three object
files, which would be the targets of compiling foo.c,
bar.c and boo.c. Remember, makefiles list rules by
target, not by prerequisite. The compilation step uses a static
pattern rule, which for each ‘.o’ file in
OBJS compiles the ‘.c’ file with the same
title. This is what runs the compiler for our three source files.
In the linking step the automatic variable $^ expands
to the prerequisites of the rule, which is the list of all object
files, and this is how the files are all linked together. If you
need more files, add them to the OBJS list.
Note that the devkitPro and tonc template files take care of these things automatically. Just put the source files into the right directory and you're good to go.
If you have been doing everything via #include, you should consider refactoring all of your stuff to separate source files. No, let me rephrase that, you need to do this because you'll benefit from it in the end. If you're already well in your project, this is going to suck because it's boring and time consuming and most likely it's not even going to work properly when you try the first build afterwards. I expect you'll get a whole slew of errors, particularly these three:
To understand what these mean, you need to know a little bit more about how C (and indeed programs) actually works.
As I said before, there aren't really things like programs, bitmaps, sound on computers; it's all just bits. Bits, bits and more bits. What makes a sequence of bits work as a program is the way it is fed to the CPU, VRAM, and other sections. Somewhere in the build process, there has to be a translation of all the C code to data and machine instructions. This, of course, is the compiler's job.
But wait, there's more. C allows you to compile each file separately,
and then link them later into the actual program. This is a good
idea, because it allows you to save time by only compiling the
files that you have recently modified, as well as the use of code
libraries, which are little more than a bunch of
precompiled source files. If you're not convinced that this is a
good idea, consider what it would take without it. You'd have to have
all the source code that you wanted to use (including
for things like printf() and all the API code), and
compile all those megabytes of source files each time. Sounds like
fun? No, I didn't think so either.
However, you need a little more bookkeeping to make this all work. Because everything is just bits, you'd need a way to find out where the function or data you want to use actually is. The contents of the compiled files (the object files) isn't just raw binary, it contains symbols. This is just a word for the group of things that have actual binary information attached to them. Among other things, the object file keeps track of the symbol's name, section, size, and where its content is in the object file. A function is a symbol, because it contains instructions. A variable is also a symbol, as is data for bitmaps, sound, maps et cetera. Preprocessor #defines, typedefs and struct/class declarations are not symbols, because they only don't have actual content in them, but allow you to structure your code better.
The other bookkeeping note is that each source/object file is a separate entity. In principle, it knows nothing about the outside world. This makes sense because it limits the dependency on other files, but it does create a little problem when you want to make files work together. This is where declarations come in.
You may have noticed that C is pretty strict when it comes to
names of stuff. Before you can use anything, it requires you to
mention what it is beforehand. For example, if you use a function
foo() in your code and you never defined its code,
or even if you put it after the call to foo(), the
compiler will complain that it doesn't know what you're talking
about. That is, it will say that ‘`foo' is undeclared’.
You have to admit it has a right to stop there: how would it know
how to use the thing if you never told it what it was?
The code snippet below gives an example of when a reference is and
is not declared, and why it's important to have a declaration.
Function a() calls foo(), which is not
known at the time, so an error is produced. Function
b() also calls foo(), which is
known at that time, but still gives an error because
foo() just happens to require an integer as an argument.
If the declaration wasn't mandatory and the call in
a() was allowed, foo() would have been
processing the wrong kind of information at runtime. There are ways
around such problems, of course, languages like PHP, VB and others
work fine without mandatory declarations, but the cost for that is
speed and possibly a lot more runtime errors.
//# C requires identifiers to be declared or defined before first use.

// ERROR: `foo' is undefined.
void a()
{
    foo();
}

// Definition of foo(). Now the system 'knows' what foo is.
void foo(int x)
{
   // code
}

// foo is known and used correctly: no errors.
void b()
{
    foo(42);
}

// foo is known but used incorrectly. Compiler issues error.
void c()
{
    foo();
}
Now back to our separate files, and the difference between declarations and definitions of symbols. A definition is something of actual content: it is what actually forms the symbol. Examples are the value(s) in variables, and the code in functions. A declaration is just an empty reference. It just says that there is something in the project with a particular name, and indicates how that something is supposed to be used: whether it's a function or variable, what datatype, which arguments, that sort of things. This is how you can use symbols from other object files.
You should be familiar with what a definition looks like. A declaration
looks very similar. The basic variable declaration is the variable name
and attributes (type, const, section) preceded by extern.
For functions, replace the code block by a semi-colon.
You can also add extern there, but it's not required.
// --------------------------------------------------------------------
// DECLARATIONS. Put these in source (.c) or header (.h) files.
// --------------------------------------------------------------------
extern int var;
extern const unsigned int data[256];
void foo(int x);


// --------------------------------------------------------------------
// DEFINITIONS. Put these in source (.c) only.
// --------------------------------------------------------------------

// uninitialized definition
int var;

// initialized definition
const unsigned int data[256]=
{
    // data
};

void foo(int x)
{
    // code
}
Now, a definition is also a declaration, but this does not work
the other way. How can it, the declaration is supposed to be empty.
The distinction is subtle, but it's the reason you might get multiple
definition errors when linking the files together. Think of what would
happen if you have the definition of function foo()
in multiple files. Each file itself would know what foo()
is because definitions are also declarations, so it would pass the
compilation stage. So now you have multiple object files, each
containing a symbol called foo. But then you try to
link them into one file. The linker sees different versions of
foo, and stops because it doesn't know which one you are
actually trying to use. The moral here is that you can have as many
declarations as you want, but there can be only one definition.
Another point I should raise is that the declaration
defines how a symbol is to be dealt with, as it is the only point of
reference if the definition is in another file. This means that, in
theory, you could have a variable var defined as an int,
but declared as a short, or even a function! While not exactly
recommended, but it is an interesting item.
Lastly: the distinction of what should go in source files, and what in headers. Source files can actually contain anything, so that's an easy one. Remember that they will contain everything after the preprocessor step anyway, because that's what #include really does. So what matters is what you put in headers. The purpose of header files is to have a place for all the non-symbol stuff that you want to use in different source files. That means declarations, #defines, macros, typedefs, struct/class descriptions. It also means (static) inline functions, because these don't form symbols either, but are integrated in the functions that call them.
All this stuff about separate compilation, declarations, and definitions is rather important for C programming, but the preceding text may be a little much to take in at once. So here is a summary of the most important points.
Potential problems during compilation or linking:
Data alignment is about the ‘natural’ memory addresses of variables. It is often beneficial to have a variable of a certain length to start at an address divisible by that length. For example, a 32-bit variable likes to be put at addresses that are a multiple of 4. Processors themselves also have certain preferred alignments. Addressing will work faster if you stick to their native types and alignment (say, 32-bit everything for 32-bit CPUs). For PCs it is not required to do any of this, it'll just run slower. For RISC systems, however, things must be aligned properly or data gets mangled.
In most cases, the compiler will align things for you. It will put all halfwords on even boundaries and words on quad-byte boundaries. As long as you stick to the normal programming rules, you can remain completely oblivious to this alignment stuff. Except that you won't always stick to the rules. In fact, C is a language that allows you to break the rules whenever you feel like it. It trusts you to know what you're doing. Whether that trust is always justified is another matter :P
The best example of breaking the rules is pointer casting. For example, most graphics converters will output the data as u16-arrays, so you can copy it to VRAM with a simple for-loop. You can speed up copying by roughly 160% if you copy by words (32-bit) rather than halfwords (16-bit). Run the txt_se2 demo and see for yourself. All you have to do for this is one or two pointer casts, as shown here.
#define fooSize ...
const u16 fooData[]= { ... };

// copy via u16 array (the de facto standard)
u16 *dst= (u16*)vid_mem, *src= (u16*)fooData;
for(ii=0; ii<fooSize/2; ii++)
    dst[ii]= src[ii];

// copy via u32 array (mooch faster)
u32 *dst= (u32*)vid_mem, *src= (u32*)fooData;
for(ii=0; ii<fooSize/4; ii++)
     dst[ii]= src[ii];
Both these routines copy fooSize bytes from
fooData to VRAM. Only the second version is much faster
because there are half as many loop iterations and also because the
ARM CPU is just better at dealing with 32-bit chunks. The only danger
here is that while fooData will be halfword aligned,
it need not be word aligned, which is a requirement for the
second version. For those readers that think casts like this and
mis-alignment only happen to other people, think again: the
faster copy routines (memcpy(), CpuFastSet(),
and DMA too) cast to word-pointers implicitly. Use them (and you
should) and you run the risk of misalignment.
There are many ways of ensuring proper alignment. The easiest way is
to not mix converted data with the rest of your stuff. That is, don't
#include data-files. This should suffice. Another method is to
convert to u32-arrays in the first place. In assembly files, you can
control alignment by using the ‘.align n’
directive, where n aligns to 2n bytes. C itself
doesn't allow manual alignment, but there is an extension for this
in GCC: ‘__attribute__(( aligned(4) ))’. Add
that to the definition and it'll be word aligned. This is often
#defined as ALIGN4 in some headers. Files in GBFS are
also always correctly aligned.
One other area where alignment can cause problems is in struct
definitions. Look at the following code. Here we have a struct
named FOO consisting of one byte, b, one word
w and one halfword h. So that's 1+4+2=7 bytes for the
struct right? Wrong. Because of the alignment requirement, w
doesn't immediately follow b but leaves 3 bytes of padding.
When defining arrays of this type, you'll also see that there
are also two padding bytes after h, because otherwise later
array-entries would run into trouble.
// one byte, one word, one halfword. 7 byte struct?
// Well let's see ...
struct FOO
{
     u8 b;
    u32 w;
    u16 h;
};

// Define a FOO array
struct FOO foos[4]=
{
    { 0x10, 0x14131211, 0x1615 },
    { 0x20, 0x24232221, 0x2625 },
    { 0x30, 0x34333231, 0x3635 },
    { 0x40, 0x44434241, 0x4645 },
};

// In memory. 4x12 bytes.
// 10 00 00 00 | 11 12 13 14 | 15 16 00 00
// 20 00 00 00 | 21 22 23 24 | 25 26 00 00
// 30 00 00 00 | 31 32 33 34 | 35 36 00 00
// 40 00 00 00 | 41 42 43 44 | 45 46 00 00
The real size is actually 12 bytes. Not only is this almost
twice the size, if you ever try to copy the array using a hard-coded 7
rather than sizeof(struct FOO), you completely mess it
up. Take this lesson to heart. It's a very easy mistake to make and
difficult to detect after the fact. If you were unaware of this fact
and you've already done some GBA coding, check your structs (or
classes) now; chances are there are gaps that shouldn't be there.
Simply rearranging some of the members should suffice to make them fit
better. Note that this is not specific to the GBA: structs on PCs
may behave the same way, as I noticed when I was writing my TGA
functions.
There are ways of forcing packing, using the
‘__attribute__((packed))’ attribute. If the
FOO struct had that, it really would be 7 bytes long.
The downside of this is that the non-byte members could be
mis-aligned and have to be put together byte for byte (the compiler
does this for you). This is very much slower than the non-packed
version, so only use this attribute if you have no other choice.
What
happens with mis-aligned (half)words then I can't tell you though, but
I'm sure it's not pretty.
GCC has two attributes that allow you to force alignment of arrays, and remove member-alignment in structs.
// Useful macros
#define ALIGN(n)    __attribute__((aligned(n)))
#define PACKED      __attribute__((packed))

// force word alignment
const  u8 array[256] ALIGN(4) = {...};
typedef struct FOO {...} ALIGN(4) FOO;


// force struct packing
struct FOO {...} PACKED;
As far as I've been able to tell, structs have always had word alignment. This was useful because it made copying structs faster. C allows you to copy structs with a single assignment, just like the standard data types. Because of the word-alignment, these copies are fast because GCC will make use of ARM's block-copy instructions, which are much faster than copying member by member.
However, this does not seem to be true under devkitARM r19 (and
presumably higher) anymore. The new rule seems to be
“structs are aligned to their largest member”. This
does make more sense as a struct of two bytes would actually be
two bytes long. However, it does mean that GCC will now call
memcpy() for non-aligned structs. Apart from it
being a function with quite a bit of overhead (i.e., it's
very slow if you want to copy a single small struct),
it will actually fail to produce correct results in some
cases. The problem is that low-number copies it will copy by the
byte, which is something you cannot do for VRAM, PALRAM or OAM.
For example, objects that we'll see later use a struct of four
halfwords; using a struct-copy there, something I am very fond
of doing, screws up everything. The only way to make it work
properly is to force word-alignment on the struct.
// This doesn't work on devkitARM r19 anymore
typedef struct OBJ_ATTR
{
    u16 attr0, attr1, attr2;
    s16 fill;
} OBJ_ATTR;

OBJ_ATTR a, b;
b= a;   // Fails because of memcpy

// Forcing alignment: this works properly again
typedef struct OBJ_ATTR
{
    u16 attr0, attr1, attr2;
    s16 fill;
} ALIGN(4) OBJ_ATTR;

OBJ_ATTR a, b;
b= a;   // No memcpy == no fail and over 10 times faster
The rules for struct alignment have changed since devkitARM r19.
Instead of being always word-aligned, they are now aligned as
well as their members will allow. If this means they're not
necessarily word-aligned, then they will use
memcpy() for struct-copies, which is slow for
small structs, and may even be wrong (see
next section). If you want to
be able to do struct copies fast and safe, either force
alignment or cast to other datatypes.
There are many different ways of copying data on this platform. Arrays,
struct-copies, standard copiers like memcpy(), and GBA
specific routines like CpuFastSet() and DMA. All of these
have their own strengths and weaknesses. All of them can be affected by
misalignment and the no-byte-write rule. I discuss some of them in the
txt_se2 demo.
I've chosen to use memcpy() in the early demos for
a number of reasons. The main one is that it is part of the standard
C library, meaning that C programmers should already be familiar with
it. Secondly, it is somewhat optimized (see the
txt_se2 demo for details). However, there are two potential
pitfalls with the routine. The first is data alignment (yes, that
again). If either the source or the destination is not
word-aligned, you're in trouble. Secondly, if the number of bytes is
too small, you're in trouble too.
Both of these have to do with the basic function of
memcpy(), namely to be a fast byte copier. But
as you know, you can't copy single bytes to VRAM directly.
Fortunately, it has an optimised mode that uses an unrolled
word-copy loop if two conditions are satisfied:
This is usually the case so I figured it'd be safe enough for the
demos. There are also look-alikes in tonclib that do the same thing
only better, namely memcpy16() and
memcpy32(), but these are in assembly so I thought I
wouldn't lay them on you so soon. Highly recommended for later
though.
On a related subject, there is also memset() for
memory fills. Be careful with that one, because that will only
work with bytes. Tonclib also includes 16- and 32-bit versions of
this routine, but also in assembly.
The last thing I want to discuss is the sizeof()
operator. In other tutorials you will see this being used to find
the size in bytes of arrays, which is then used in
memcpy(). It's a good procedure but will not always
work. First, sizeof() actually gives the size of the
variable, which need not always be the array itself. For
example, if you use it on a pointer to the array, it'll give the
size of the pointer and not of the array. The compiler
never complains, but you might when hardly anything is copied.
Secondly, sizeof() is an operator, not a
function. It is resolved at compile-time, so it needs to be able
to find the size at that time as well. To do this, either
the declaration (in the header) should indicate the size, or
the array definition (in the source file) should be visible.
Bottom line: you can use sizeof(), just pay attention to
what you use it on.
Okay, that was the long and boring –yet necessary– section on data. Congratulations if you've managed to stay awake till this point, especially if you've actually understood all of it. It's okay if you didn't though, in most cases you won't run into the problems discussed here. But just remember this section for if you do run into trouble when copying and you can't find it in the code; it might save you a few hours of debugging.
The bm_modes is an example of how the same data can result in different results depending on interpretation (in this case, modes 3, 4 and 5). In the code below, I make one copy into VRAM, and switch between the modes using Left and Right. The results can be seen in figs 5.7a-c.
I've arranged the data of the bitmap in such a way that the name of the current mode can be read clearly, as well as indicated the mode's boundaries in memory. Because the data intended for the other modes is still present, but not interpreted as intended, that part of the bitmap will look a little shitty. And that's partly the point of the demo: when filling VRAM, you need to know how the GBA will use the data in it, and make sure it'll be used. If the bitmap ends up being all garbled, this is the likely suspect; check the bitdepth, dimensions and format (linear, tiled, compressed, etc) and if something conflicts, fix it.
Now, sometimes this is not as easy as it sounds. The general procedure for graphics is to create it on the PC, then use an exporter tool to convert it to a raw binary format, then copy it to VRAM. If the exporter has been given the wrong options, or if it can't handle the image in the first place, you'll get garbage. This can happen with some of the older tools. In some cases, it's the bitmap editor that is the culprit. For paletted images, a lot depends on the exact layout of the palette, and therefore it is vital that you have a bitmap editor that allows total control over the palette, and leaves it intact when saving. MS-Paint for example does neither. Even very expensive photo editing tools don't, so be careful.
For this image, I used <plug>my own bitmap editor
Usenti</plug>,
which not only has some nice palette control options, and tiling
functions, but a built-in GBA graphics exporter as well. To make the
background be the same color in all modes, the two bytes of the
16bit background color of modes 3 and 5 had to serve as palette
entries for mode 4, both using that 16bit color again. In this case,
the color is 0x080F, sort of a brownish color. The bytes
are 8 and 15, so that's the palette entries where the color goes too.
Normally you don't have to worry about switching bitdepths mid-game,
but knowing how to read data like this is a useful debugging skill.
#include <string.h>
#include "toolbox.h"
#include "modes.h"

int main()
{
    int mode= 3;
    REG_DISPCNT= mode | DCNT_BG2;

    // Copy the data and palette to the right
    // addresses
    memcpy(vid_mem, modesBitmap, modesBitmapLen);
    memcpy(pal_bg_mem, modesPal, modesPalLen);

    while(1)
    {
        // Wait till VBlank before doing anything
        vid_vsync();

        // Check keys for mode change
        key_poll();
        if(key_hit(KEY_LEFT) && mode>3)
            mode--;
        else if(key_hit(KEY_RIGHT) && mode<5)
            mode++;

        // Change the mode
        REG_DISPCNT= mode | DCNT_BG2;
    }

    return 0;
}
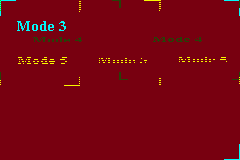 Fig 5.7a: bm_modes in mode 3.
|
 Fig 5.7b: bm_modes in mode 4.
|
 Fig 5.7c: bm_modes in mode 5.
|
Now we've seen some of the basics of the GBA bitmap modes: the properties of modes 3, 4 and 5, page flipping, rudimentary drawing for mode 3 and one of the most important rules of VRAM interactions: you cannot write to VRAM in bytes. There is much more that can be said, of course. Bitmap graphics is a rich subject, but going into more detail right now may not be the best idea. For one, the bitmap modes are very rarely used in games anyway, but also because there are other things to talk about as well. Things like button input, which is what the next chapter is about.
This chapter also discussed a few things about handling data, a very important topic when you're this close to the hardware. Datatypes matter, especially when accessing memory through pointers, and you need to be aware of the differences between them, and the opportunities and dangers of each. Even if you don't remember every little detail in the data section, at least remember where to look when things go screwy.
Before continuing with further chapters, this may be a good time to do some experimenting with data: try changing the data arrays and see what happens. Look at the different data interpretations, different casts, and maybe some intentional errors as well, just to see what kinds of problems you might face at some point. It's better to make mistakes early, while programs are still short and simple and you have less potential problems.
Or not, of course :P. Maybe it's worth waiting a little longer with that; or at least until we've covered basic input, which allows for much more interesting things than just passive images.
| Prev | Contents | Next |
| Video intro | Keys |