3.
WinGrit v0.8.3
3.1.
Introduction
The GBA Image Transmogrifier (“grit” for short) is a bitmap
conversion tool for GBA/NDS development. It accepts a multitude of
file types (bmp, pcx, png, gif, etc) at any bitdepth and can convert
them to palette, graphics and/or map data that can be used directly
in GBA code. The output formats are C/asm arrays, raw binary files
GBFS files, and a RIFF-format I call GRF. The data can be compressed to
fit the BIOS decompression routines.
Grit can do more than simply turn bitmap into arrays. It allows you to
crop or enlarge the original work area, convert between bitdepths,
break the images up into tiles or metatiles and supports NDS
bitmaps with transparency. It also has a number of tile-mapping
options: it can take the bitmap and turn it into a tilemap (and metamap)
and a set of unique tiles. It can also merge the palettes or tilesets from
multiple files.
If you need more, feel free to add your own code. This is an open-source
project and the code should compile on all platforms, though you'll
have to write your own makefiles for non-Windows environments.
Grit comes in two flavors: a command-line version, grit, and a
Windows GUI, wingrit. This is the documentation for the
GUI version.
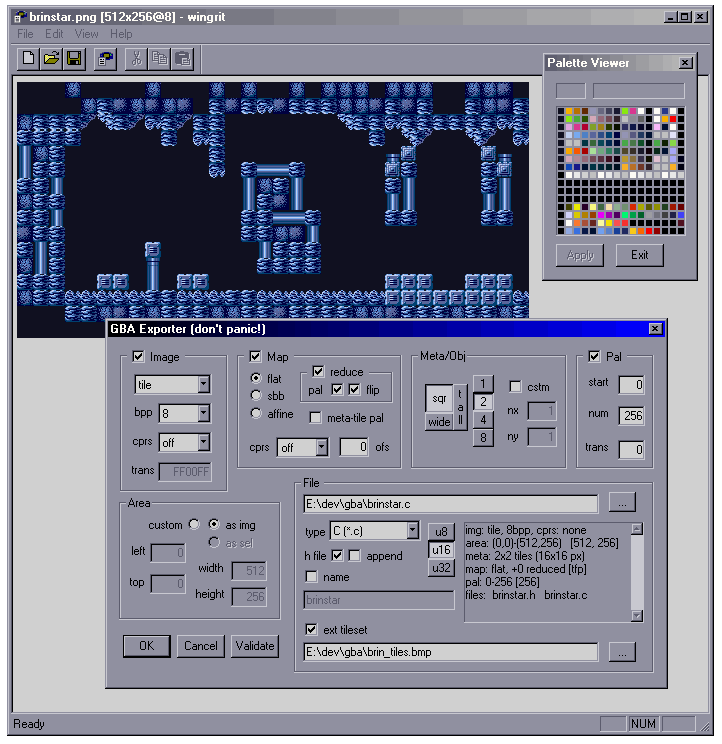 Fig 3.1
: Wingrit main view
3.2.
Wingrit
The window that pops up first is basically an image viewer. Open any
image and it is shown on the screen. You can zoom in and out with the
scroll wheel and move it around with the middle mouse button. There
are a few useful options in the menu like convertion to 16bpp,
quantisation and also a palette viewer. The meat of the program is
in the View window: the GBA Exporter. That's the big thing with all
the buttons in fig 3.1.
There are 6 zones in the exporter:
- graphics
- map
- meta/object
- palette
- area
- file
And of course the main buttons in the lower left corner. There's also a
summary window on the righthand side, which tells you a little about
what and how the image will be exported.
The following is a list of options found on the dialog. The parts
between parentheses are the corresponding command-line options.
3.2.1.
Graphics
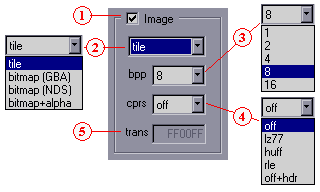 Fig 3.2
: graphics options.
Graphics exporting options. Governs the actual graphics part of the data
(i.e., the pixels). Affixes: “Tiles” or
“Bitmap”.
-
Enable box (-g[!]). Include (default) or exclude
graphics in the output.
-
Gfx format. The GBA has 2
basic graphic modes: tiled or bitmaps. The NDS has those too, but
allows for bitmap transparency as well, which is why there are four
modes here.
-
Tiles (-gt). tiles of 8×8 pixels.
Required for mapping and metamapping.
-
GBA Bitmap (-gb). Bitmap with bit 15 clear
(if 16bpp).
-
NDS Bitmap (-gb -gT!) Bitmap with bit 15 set
(if 16 bpp).
-
NDS with transparency (-gb -gT[hex]). Bitmap with
bit 15 set, except for the transparent color.
-
Bit depth (-gB<n>).
Usually, the bitdepths for GBA graphics are 4, 8
or 16 (for modes 3 and 5). 1 and 2 bpp are added for bit-packing.
For example, a monochrome mode 3 font can be put in 1 bpp format
instead of 16 bpp, for an effective compression of 94%. NDS
textures can also be 2, 4, 8 and 16 bpp. If you're clever, you
can use this for alpha-textures too.
-
Graphics compression.
-
Off (-gz!). No compression, default.
-
LZ77 (-gzl).
Actually LZSS, but somehow LZ77 is the name Nintendo uses. The
data is Vram safe.
-
Huff (-gzh).
8bit huffman compression.
NOTE: for some reason it still doesn't always
work, and I have yet to find out why. Use with caution.
-
RLE (-gzr).
8bit Runlength encoding the way the GBA BIOS routine
RLUnCompVram() likes it.
-
Off+hdr (-gz0).
No compression, but with a compression-like header for
compatibility. Byte 0: 0x00. Bytes 1-3: size.
-
Transparent color (-gT [hex]).
For use with bitmap+alpha mode.
3.2.2.
Map
 Fig 3.3
: mapping options.
Covers mapping (and some meta-mapping) options. Unlike palette and
graphics, map data is excluded by default. For meta-mapping to
work, you need: a) map data included and b) the tile-groupings should be
larger than 1. Affix: “Map” (and maybe
“MetaMap”).
-
Enable box (-m[!]). Include or exclude
(default) map (and meta-map) in the output.
-
Map layout.
The primary formats for GBA maps are regular
(text) and affine (rotational), the former using 16bit screen
entries and the latter 8bit. There is a second difference in that
affine maps are ‘flat’ in memory, while the bigger
regular maps are divided into separate screenblocks. This can make
dealing with regular maps a tad annoying, because you may have to
rearrange things to fit into the screenblocks.
-
Flat (-mLf).
Regular screen entries, but flat map layout.
-
Sbb (-mLs).
Regular screen entries, and the map is already grouped into
sbbs.
NOTE: in order for this to work, the area
will be padded to 256x256 pixel boundaries.
-
Affine (-mLa).
Affine map in both screen entry format and layout.
-
Tile reduction (-mR[tpf]).
An image intended for tilemaps will often have duplicate tiles,
which can be removed from the full tileset
(i.e., the all the 8x8 tiles of the whole image). That's kind of
the point of having tile-maps after all. This gives rise to a
reduced tileset, which can be much smaller that the full
set.
-
-
Tile reduction switch Toggles tile reduction feature.
It it recommended to use this feature, as not using it
will just give a trivial map of incremental entries for each
tile in the image.
-
Tile palette reduction (-mRtp).
For regular 4bpp maps, you
can have palette information in the screen entries as well, so
you wouldn't need extra tiles for that. This removes tiles that
differ only in their palette bank.
-
Reduce flipped tiles (-mRtf).
Regular maps support tile
flipping. This option removes tiles if they differ from earlier
ones just by flipping.
NOTE: The reduced tileset always starts with an empty tile.
As tile-0 is often ‘special’, I thought this'd be
appropriate.
-
Meta-tile palette reduction (-MRp).
Normally, meta-tiling only looks at the full equality of the screen
entries. This option allows further reduction based on the palette
bank, which will be shared for the whole meta-tile.
-
Map compression.
-
None (-mz!). No compression, default.
- LZ77 (-mzl).
Actually LZSS, but somehow LZ77 is the name Nintendo uses. The
data is Vram safe.
- Huff. (-mzh)
8bit huffman compression.
NOTE: for some reason it still doesn't always
work, and I have yet to find out why. Use with caution.
-
RLE (-mzr).
8bit Runlength encoding the way the GBA BIOS routine
RLUnCompVram() likes it.
-
Off+hdr (-mz0).
No compression, but with a compression-like header for
compatibility. Byte 0: 0x00. Bytes 1-3: size.
I should probably point out that 8bit RLE is a very bad idea
for regular maps, as the upper and lower bytes of the screen
entries will rarely match.
-
Tile offset (-ma <n>).
For when you don't intend the tileset to be at the start of a charblock.
I would like to add more options here, like column-based maps, which
should be easier to deal with for horizontal scrollers. But this
will have to wait.
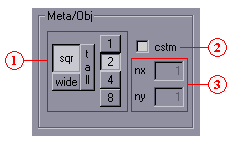 Fig 3.4
: Metatile options.
Tile grouping (-Mw<n> -Mh<n>).
Grouping tiles can be done for two purposes. The first
one is the obvious one to make sprite sheets work for linear sprite
mode.
The second one is for meta-mapping – grouping multiple
screen-entries (the meta-tiles) and using a map of those meta-tiles
(the meta-map) instead of the full map. Depending on the size and
variation of the metatiles, this can reduce the storage needed for the
description of the entire map.
The Grit meta-tiling formatting works like this. If you export a
(meta)map with the basename “foo”, then the
map of the thing (fooMap is actually the metatile-set,
which are composed of screen entries. The metamap is put in
“fooMetaMap”. The entries of the metamap are
16bit, the lower 12 being the metatile index; the upper 4 the metatile
palette bank, if applicable.
In order for metamapping to occur, map exporting must be on and the
metatiles must be more than one tile in size.
-
Fixed groupings. Corresponding to the standard GBA sprite
sizes and shapes.
-
Custom grouping. If you want groupings other than sprite
sizes, toggle this and fill in the boxes.
-
Custom group sizes. Width and height of tile groupings for
custom mode. Note that the sizes are in units of tiles. Entering
(8, 8) here would actually indicate 64x64 pixel tiles, for example.
3.2.4.
Palette
Palette exporting options. Affix: “Pal”.
-
Enable box (-p[!]).
Include (default) or exclude palette in the output.
-
start (-ps <n>).
First entry of the full palette to export.
-
num (-pn <n>).
Number of palette entries to export. start and
num form a subset of colors,
[start, start+num). Range will be clamped to
available palette at validation.
-
Transparent index (-pT). Normally, index-0 is the
transparent index in paletted images. This pick another one.
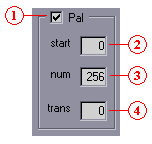 Fig 3.5
:
|
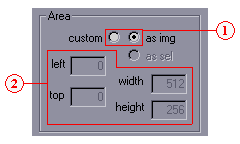 Fig 3.6
: area options.
|
3.2.5.
Area
Lets you select the region of the image that you want to use. Most of
the time this will probably be the whole image, in which case you can
pretty much ignore this zone, but just in case you want only a portion,
you can use this.
-
Area options. Right now, this is just a switch between
using the full image or a custom area. I did plan on using some
kind of ‘selection’ tool and option, but I'll have to
see whether anything ever comes of it.
-
Area. Size of the rectangle you want to export. Note that
the right-hand boxes are the sizes, and not the right and
bottom sizes. You should probably also know that the final
rectangle may change a little but due to the aligning requirement
for (meta)tiling and sbb-map format.
3.2.6.
File / symbol options
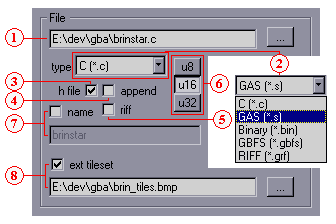 Fig [[ref:ig-xp-file]]
: File options.
Various file and symbol name/type options.
-
Destination path (-o <path>).
Filename of where the data should go. If
you don't want to type it in manually, there's a button to launch a
file dialog on the right. The full path is (probably) not required,
but can't hurt.
The extension determines the file-type; if it's not recognized, it
will default to a C file.
-
File type. The extension will be based on this field,
regardless of what you may have put into the path-field. Options
are:
- C file (-ftc).
Extension “.c”. Data may be word aligned.
- GNU Assembly file (-fts).
Extension “.s”. GNU asm. Word aligned.
- Binary (-ftb).
Final extension: “.bin”. Binary
data goes into multiple files, each with an infix extension for
the different data fields (“pal”, “img”,
“map”, “meta”) to make
“foo.pal.bin”, etc.
- GBFS (-ftg).
Extension “.gbfs”. Creates files for
use with tepples'
GBFS file system.
- RIFF / GRF (-ftr).
Extension “grf”. Creates a RIFF-based binary with
the items in chunks. See
grit:grf for details.
-
Enable header file (-fh[!]).
Creates a header file with declarations and a description of
the data. This does NOT contain actual data! Data
definitions in header files is bad, very bad, mkay?
Mkay! Mkay. Apart from data declarations, it'll also hold size
defines, the names of which are the data-names + “Len”.
-
Append mode (-fa). Appends the data to the
destination file, useful for keeping the number of files down.
If data of that name exists already, it will be replaced.
Binary files cannot use appending.
-
riff (-fr).
Enable GRF-format for non-grf files as well. Currently only for
C and asm export. Note that this also forces off comrpession
to off+hdr.
-
Data-type (-U<n>).
Arrays are in bytes, halfwords or words. Has no effect on binary
or GBFS files.
-
Base symbol name (-s <name>).
The base-name part of the data arrays.
If it's not a valid C name, the invalid parts will be replaced by
underscores. The full names are created by adding the following
affixes:
“Pal”, “Tiles”,
“Bitmap”, “Map”,
“MetaMap”. For
example, bitmap-data for the basename “foo” will be
“fooBitmap”.
By default, the basename is based on the path's title, but you can
add a name manually too.
NOTE. GBFS files use a 24 character name field. To make
sure of distinguisable names, the basename will be truncated to a
21 character maximum, to which the affix is then added.
-
External tileset. (-fx) With this, you can use
an external tileset to map the bitmap to a tilemap. The combined
tileset will be saved as well. This allows you to build up a shared
tileset.
NOTE: mapping must be enabled for this, and metamapping is
not fully supported here yet.
3.3.
Last changes
v0.8 (20080323)
- Changed things to allow GRF format: grf filetype,
riff button and off+hdr compression format.
- See grit.htm for other changes.
v0.7 (20070414)
- Rebuilt the Huffman encoder from scratch using the Huffman thing
from Numerical Recipes. Unfortunately, it still screws up in
one of my test images, but less than before. (Of course, any
slight error in a huffman-compressed file pretty much destroys the
whole thing, but I'll ignore that for now)
- The tile reducer always starts with an empty tile now, rather
than the first one encountered. This is usually preferable as 0 is
usually special.
- Added a
u8 option.
- Exporting maps in screen blocks is operational. Note that the
image will be 256x256 aligned, which is required for the
screen block format.
- Symbol names are forced to be valid C names.
- The header also contains a preface; useful for non-source files.
- GBFS export.